

Flows | Upload File using Flow in Salesforce
Salesforce Flow File Upload
In this blog I am going to show how to Upload Files using Flow Builder in Salesforce. We will also see how to use Screen Flows to create Record Create Forms.
If you are not in love with Flows already it is probably because you haven't started using and playing around with them. I was in the same club till 3 months back. But since I have started using them I cant imagine myself not using them for most of the automations nowadays.
Main takeaways from this article will be:
- Basic idea about Salesforce Screen flow and some of its capabilities.
- Use of Picklist as an input in a Screen with picklist options taken directly and dynamically from a Salesforce Object.
- File Upload using Screen Flows.
- Creating a record in Salesforce using screen flows.
- Use of flows in public community pages and replicating web to case form with option to upload files
Sample Use Case:
A public Web to Case form for community page is needed. This form should also allow customers to upload any files if they require and these files must be attached automatically on the case record created from the form. This form should be reusable on any other page like community, record pages or home pages
Screen Flows can be quite useful for this scenario. I have shown a very basic example but possibilities are endless (Dramatic sound Inserted!).
Spoilers! (Yes, I read the ending before starting a book )
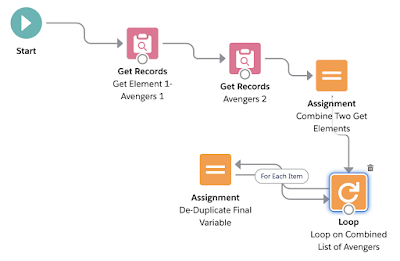
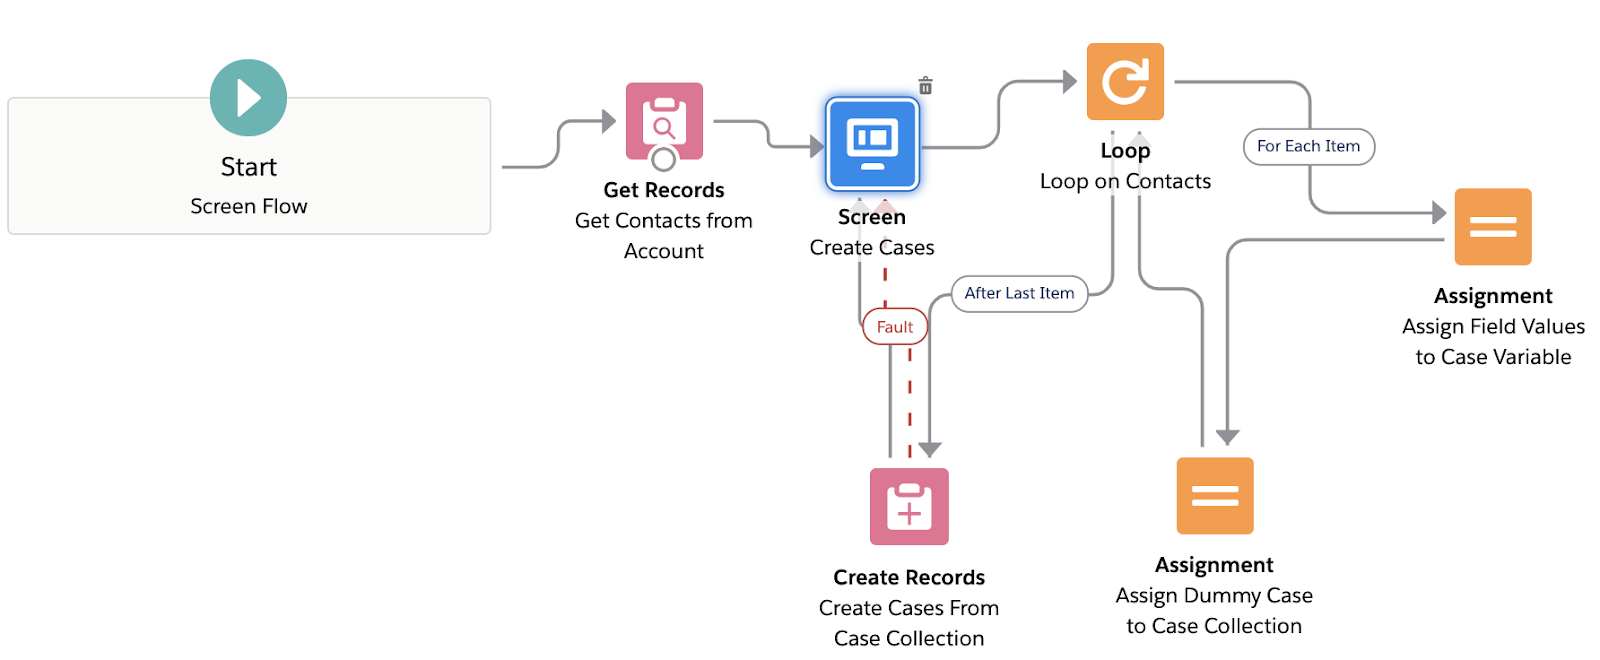
Here is the Final Design of the Flow and how it will look like:
Here is the Final Design of the Flow and how it will look like:

This Flow has 7 Elements: I will go through each element in detail with a mini video to show how to create and use each one of them. Play by Play literally!
 This is the first screen where we will include all the fields which the user will need to fill in order to submit a case to the Salesforce.
Also, we will include a check box which will be used to identify if the user wants to upload files too with the case.
This form will also include a picklist field from Case Object.
Screen Flows have almost all input types like picklist, checkbox ,radio button, date, time etc.etc.
Cool fact about picklist in Flows is that we can fetch and use any object's picklist option values from Salesforce without hardcoding them in the flow. This way our pick-lists options are dynamic and they change as per changes in salesforce metadata automatically. Cool Right?
Points to Note: For File Upload, flows have an out of the box feature/input component but that requires a parent/associated Record Id which in our case is the Case record Id. But since we will not have a case Id before creating the case so the idea is that on first screen the user will fill the fields for creating the case and then on submit a new case is created and we will store the newly created Id.
We will then use this Id to map to Upload file component on the next screen if user check the upload file check box. This will be more clear later in the article.
Checkout the video for case screen.
1. Case Create Screen Element:

Also, we will include a check box which will be used to identify if the user wants to upload files too with the case.
This form will also include a picklist field from Case Object.
Screen Flows have almost all input types like picklist, checkbox ,radio button, date, time etc.etc.
Cool fact about picklist in Flows is that we can fetch and use any object's picklist option values from Salesforce without hardcoding them in the flow. This way our pick-lists options are dynamic and they change as per changes in salesforce metadata automatically. Cool Right?
Points to Note: For File Upload, flows have an out of the box feature/input component but that requires a parent/associated Record Id which in our case is the Case record Id. But since we will not have a case Id before creating the case so the idea is that on first screen the user will fill the fields for creating the case and then on submit a new case is created and we will store the newly created Id.
We will then use this Id to map to Upload file component on the next screen if user check the upload file check box. This will be more clear later in the article.
Checkout the video for case screen.
2. Create Records Element :
Using this element we are just creating a new case record from the input values from first screen.
Here we will just map the user input values from the first screen with case fields in salesforce and create the case. Simple Isn't it? Checkout the video below to see how to use input values from Ist screen in this element as field values for case.

Points to Note: We are storing the newly created Case Id in a variable at the end. This variable will be used later to upload file(as a parent record Id) and also to get details about this newly created case (Using Get Records Element).
This is a hidden element and user doesn't see this action the screen. After user submits the fields from first screen the case is created automatically in the salesforce.
Tip: Always create a fault path to show errors if something goes wrong. I have shown this later in the article.
3. Decision Element:
 This element is to decide the screen that follows once user submits the form in the first screen.
The criteria for the second screen is the value in the checkbox field from first screen. Remember?
Based on the input, decision element will determine if the user sees the upload file screen or not.
Please Note: See how to use the input values from the first screen later in the video below. Value from every field or input entity we create in the screen can be used anytime later in the flow and that's the whole beauty about it.
4. Attach File Screen Element:
This screen will be shown if user ticks the attachments? checkbox field on the first screen. Using this screen user can upload files.

Checkout in the video how to use the variable assigned in the Create Record Element {!CaseIdNew} to assign as a parent of the File Upload Component.
5. Get Records Element:
Using this element we are just fetching the case record details of the newly created case based on the Id of the new case which we stored in the create record element {!CaseIdNew} .
The case record details can then be used anywhere in the flow later to use these case record values. I have just used this to get the case number later on to show the confirmation to user and provide them the case number. This we will see in the later part of this article.
This is the default step after user submits the form with or without uploading the file.
Refer to the flow design diagram to get an idea of how this works and where it is used in the flow path.
6. Submit Confirmation Screen Element:
Here we are again creating a screen.It will just use the display text option and this screen will be shown when user fills the input form on 1st screen and uploads the file in second.
Also, if user had not selected the upload file option, then after the first screen, this screen is shown directly to the user.

Here, I have used the Case Number from the Get Records Element from previous step. I am using this value as a merge field in my text message to show to the user the case number.
After creating this screen just connect this with the first screen so that user will see a new Case form.
Please checkout the video:
7. Error Screen Element:
This is the placeholder to show on the screen if anything goes wrong due to some salesforce issues or user input. We will again use a screen element to just display the fault/error message.

Here we will use $Flow.FaultMessage which is available out of the box to display the error message.
This fault screen has to be connected with Create and Get Elements.
Please check out the video.
And we are done. The final flow should look like as shown above in the flow diagram.
This is a just a very basic and simple use case to demonstrate the capabilities and some useful features of the flow.
Note: Don't forget to checkout the File Size Limits using this feature and File Types Supported in Salesforce's official documentation.
Activate and save this flow and start using it.
Demo :I have a community page which I have enabled for Public so that guest users can access the same without even logging in. In community builder, under Components choose flows and select this flow for the page(Home page in my demo).
Below is a working demo of the Flow. Please note this demo is on a public community page.
Hope this article helps. Will come up with much more Flows use-cases and features in later articles.
Please provide your valuable feedback and suggestions.
Don't Miss Latest Posts : CLICK HERE TO SUBSCRIBE TO THIS BLOG
Checkout this Article for all Flow Related Scenarios : All Flow Examples


Leave your comments
ReplyDeleteReally so helpful, effective and very clear to understand ,thank you ...keep on posting
DeleteThis is very useful
ReplyDeleteThanks!
DeleteThanks for posting this
ReplyDeleteFirst of all thank you for posting this. But I encountered an error when I upload a file with a non-admin user. If I used a admin user it will be uploaded. Do you have any idea why files cannot be uploaded using non-admin? thanks!
ReplyDeleteThis might be because of Object Permission Issue for the user. There are several permission required to upload files in Salesforce. Try uploading the file normally from UI from that user and see if that is allowed.
DeleteHi Vibhor, thanks for the reply! Yeah I have checked the object permission of that user and I cannot see the 'Case' object there where I have a screen flow that creates case by a user.
DeleteYour videos dont always load for example on step 2, 5 etc. this is making it hard to follow..
ReplyDeleteThanks for pointing this out. This is all fixed! Thanks for reading and reach out to me in case of any discussion needed around Salesforce or Flows!
DeleteVery useful... I was banging my head trying to use Upload attachment on First Screen... Thank you!
ReplyDeleteThanks :) Glad this helped
DeleteAfter creating flow we have to upload file manually so can't we just use the attachments under Case relate list instead of creating flow?
ReplyDeleteI invoked this flow on Opp and created Action button called New Case. New case is created but attachment is not showing
ReplyDeleteLoved working on flows through your blog! keep going :)
ReplyDeleteVery helpful example Vibhor..!
ReplyDeleteVery useful Business scenerio Vibhor..!
ReplyDeleteI enjoyed reading your blog post, the topic was very interesting and the writing was engaging.
ReplyDeleteVisit: Cyber Security Course in Pune